GN Mud Agitator plays a very important role in solids control. To keep both the mud uniform and the suspension of drilling mud, the mud agitator is used to agitate the mud consecutively and reliably. This agitator agitates the mud to make cuttings, silt, and sand pass the solids control system without being precipitated onto the tank bottom.
When installing the GN Mud Agitator (F), it should be lifted horizontally and placed smoothly in the position to be installed.
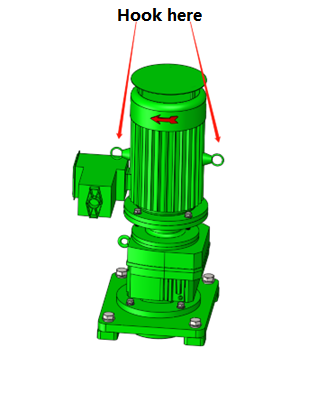
During installation, the agitator should be hoisted horizontally and placed stably at the position to be installed, and then the bottom plate should be fixed on the pad (welded on the tank surface) with an M16×50 bolt assembly.
First of all, it is necessary to check that the four pads of the fixed agitator are in a relatively horizontal position and that the error is within ±1mm, to ensure the normal operation of the equipment. If there is a centralizing sleeve, the centralizing sleeve must be perpendicular to the center of the mounting base.
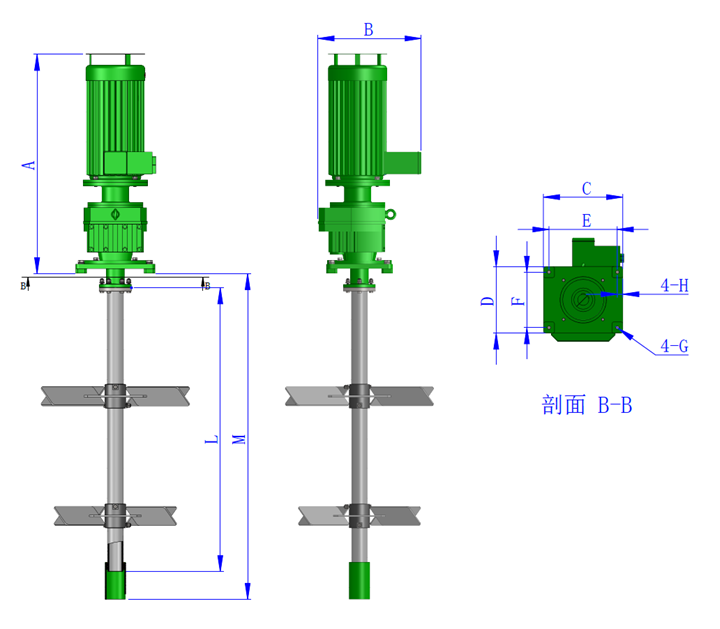
Agitator installation dimension table
| Motor
S/C |
3Kw | 5.5kw | 7.5kw | 11kw | 15kw | 18.5kw | 22kw |
| A | 772 | 940 | 990 | 1160 | 1190 | 1245 | 1245 |
| B | 419 | 547 | 507 | 559 | 559 | 589 | 589 |
| C | 390 | 390 | 390 | 430 | 430 | 430 | 430 |
| D | 320 | 320 | 320 | 360 | 360 | 360 | 360 |
| E | 330 | 330 | 330 | 370 | 370 | 370 | 370 |
| F | 260 | 260 | 260 | 300 | 300 | 300 | 300 |
| G | φ20 | φ20 | φ20 | φ20 | φ20 | φ20 | φ20 |
| H | 30 | 30 | 30 | 30 | 30 | 30 | 30 |
| M | Determined according to tank inner depth | ||||||
| L | Determined according to tank inner depth | ||||||
Agitator Mounting Plate
The installation location needs to be determined in advance. Choose the installation location to leave the gap between the impeller and the tank wall. Use a spirit level to maintain the absolute level of the board. Use the adjusting pads to maintain the level and mark the pad’s position.
Stabilizer
All GN agitators are equipped with stabilizers. The total height of the stabilizer is 200mm, install the stabilizer as follows:
The installation of the stabilizer is as follows:
- Put a vertical line from the center hole of the mounting base plate, and the point of contact with the tank bottom is the center point of the stabilizer
- After determining the installation position of the stabilizer according to the center point, weld the stabilizer sleeve to the bottom of the tank.
3.1.3 Shaft Assembly
After installing the tank bottom stabilizer, put the shaft in the tank for assembly.
- Put the shaft into the tank and keep the shaft upright when assembling the impeller and the shaft.
- Install the impeller on the mixing shaft.
- Put the bottom of the mixing shaft into the welded stabilizer sleeve.
- Connect and fasten the rigid coupling reducer end and the mixing shaft end with bolts. At this time, adjust the position of the stabilizer sleeve to make the mixing shaft vertical, and ensure that the mixing shaft rotates normally, and ensure that the stabilizer sleeve will not affect the mixing shaft rotation; otherwise, it will cause the yaw of the impeller shaft, aggravate the wear of the reducer or damage the bearing.
- Install the impeller and fix the impeller with bolts.
- When the agitator shaft is shipped from the factory, the impeller mounting holes are made according to the tank height offered by the customer.
- Spread a thin layer of butter on the bolt and screw it onto the mixing shaft and impeller.
- Fix the impeller in the corresponding position on the shaft.
- Tighten the bolts gradually and sequentially.
- If you need to install the upper impeller, the steps are the same
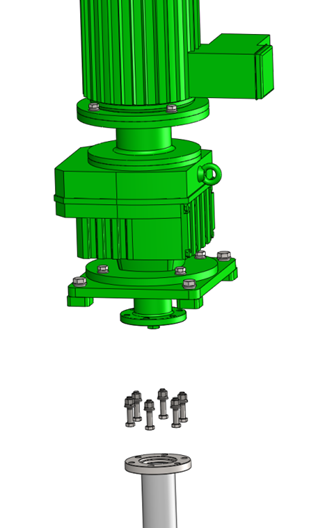
Motor and Gearbox Assembly and Installation
GN Solids Control will install the motor and gearbox before delivery. Clients can install or disassemble as needed. For details, please refer motor/gearbox user manual. Gearbox and Motor Installation drawing please refer figure below.

Gearbox Coupling and Impeller Connection
- Align the shaft so that the mixing shaft and the driving shaft coupling are completely connected.
- Make sure there is no gap in the outer flange of the coupling. No gap means no connection bias.
- Align the coupling, put in and tighten the bolts, and adjust well.